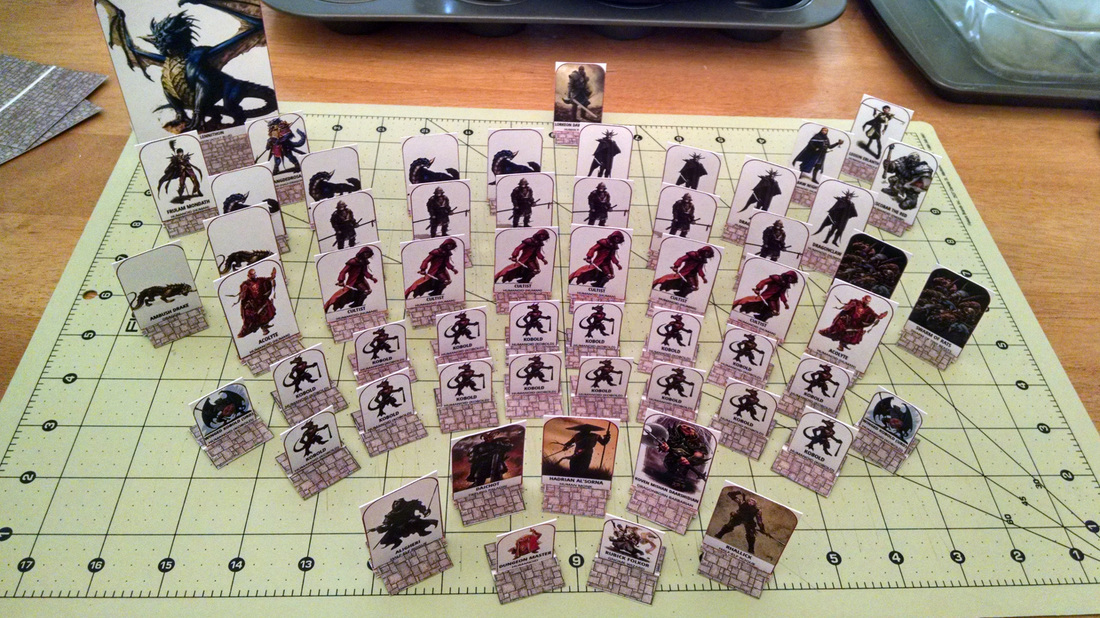
This is a tutorial for making paper tokens the same dimensions as Pathfinder Pawns, with removable bases. When finished, they will look like this:

To make these tokens, I'll be using two software programs, both free. The image editor is GIMP (I'll use it the most), and I use TokenTool to quickly size my tokens. Note that you don't have to use TokenTool; you can resize an image layer dynamically with GIMP, but it's a lot clunkier than just resizing with TokenTool and I highly recommend this extra step.
Once you've got these installed, you'll also need some physical supplies:
Once you've got these installed, you'll also need some physical supplies:
- heavy paper (I use 100# cardstock I got at Wal-Mart)
- metal ruler
- exacto knife & scissors
- tacky glue (for papercraft, but any quickdrying non-gluestick will do)
- cutting mat (highly recommended for any papercraft)
| overlays.zip |
This ZIP file contains all of my XCF files for GIMP (overlays for different token sizes, plus three sizes of token base) as well as four overlay files to use in TokenTool.
MAKING OUR BASE TOKENS WITH TOKENTOOL
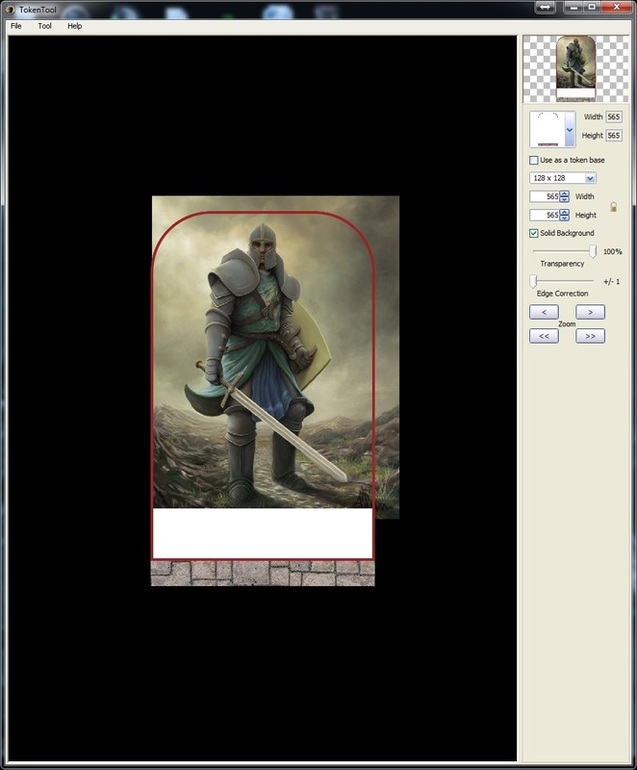
So first off, open up TokenTool. You'll need to import the PNG files to have them available as templates.
With all that done, you're ready to either drop an image file into the black area, drag an image from a browser into the window, or choose Tool > Screen Capture and capture a portion of the screen. Whichever you choose, you'll now have your image "under" the template. Anything outside the red border will be cut off. You can drag the image around and zoom in and out with your mousewheel. There's a preview of the finished token in the top right. Once you like how your token looks, choose File > Save Token and remember where you save it. I'd recommend doing all your tokens now--happy image hunting! (I use Google Images and Deviant Art mostly.)
- Click on File > Manage Overlays
- Drag each of the PNG files into the Overlay Manager window one at a time. You'll see each one appear right away.
- Click Close when finished. Now you're ready to make tokens!
- Small: 376x376
- Medium: 565x565
- Large: 826x826
- Huge: 1277x1277
With all that done, you're ready to either drop an image file into the black area, drag an image from a browser into the window, or choose Tool > Screen Capture and capture a portion of the screen. Whichever you choose, you'll now have your image "under" the template. Anything outside the red border will be cut off. You can drag the image around and zoom in and out with your mousewheel. There's a preview of the finished token in the top right. Once you like how your token looks, choose File > Save Token and remember where you save it. I'd recommend doing all your tokens now--happy image hunting! (I use Google Images and Deviant Art mostly.)
finalizing token in GIMP
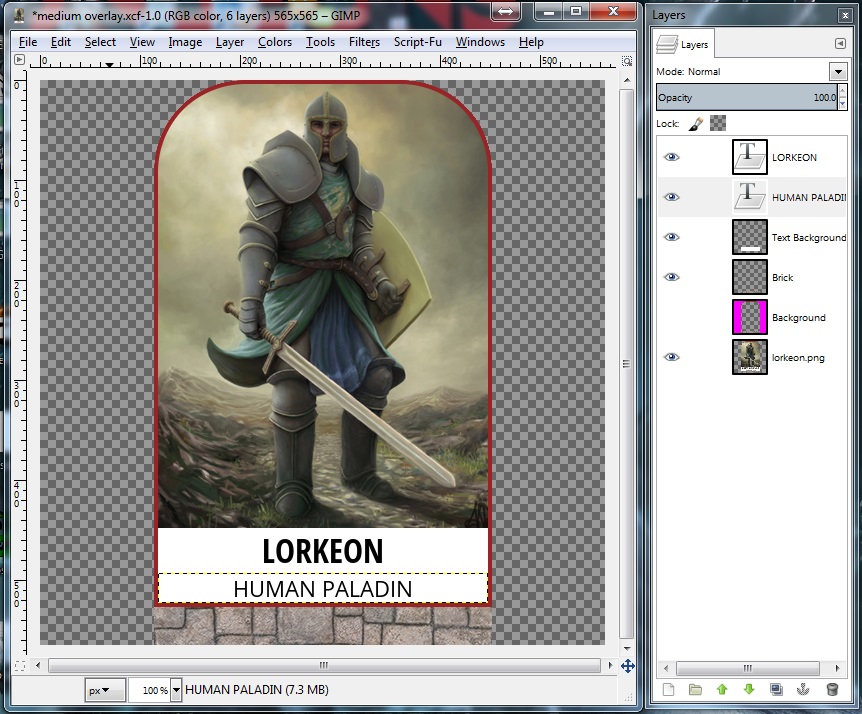
Now that you have your base token made with TokenTool, it's time to add some text to it with GIMP! Because the template in TokenTool was made from the same template we're using in GIMP, it will line up perfectly with no fiddly bits. First open up the appropriate XCF file in GIMP--for this medium token, that's medium overlay.xcf.
Now just follow these simple steps:
Your token should look something like this:
Now just follow these simple steps:
- Drag the PNG created with TokenTool into the Layers window of GIMP, and drop it below the Background layer.
- Click the eye icon next to Background, to hide that layer (the purple will disappear)
- Using the Text Tool (big letter A), triple-click on INSERT NAME (which will highlight the line)
- Type whatever name you wish here. If it runs off the screen, select all the text again and adjust the font size down till it fits. Don't move the text though, it autocenters as you type.
- Repeat this process for the "Creature Type" line. I put the Race Class for PCs here, or the monster subtype entry on NPCs like "Humanoid (Kobold)".
- Choose File > Export As... and save as a PNG (I actually just save over the source image).
Your token should look something like this:
printing your tokens
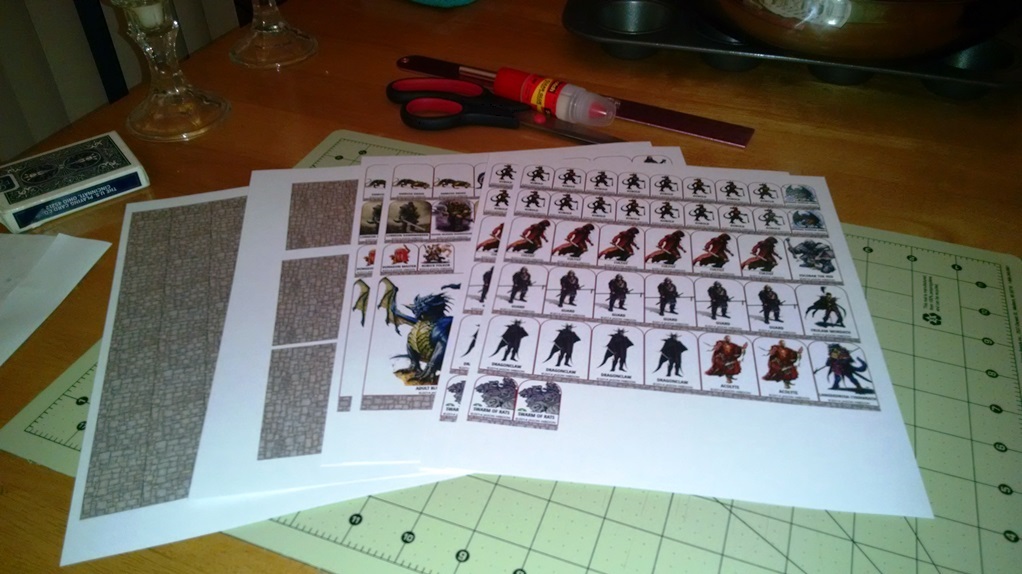
Once you've made all your various tokens, you'll need to print them out! The easiest way I've found is to make an 8"x10" document in GIMP with 300 DPI resolution, then just drop my tokens in one after another. If you want to get really fancy, you can paste a token, then paste it a second time and choose Layer > Transform > Rotate 180to flip it over, and carefully place it on top of the first token, so that it's ready to cut out and fold in half. Or you can just print the sheets twice; whatever you like. Here's a sample of one of my token sheets ready for printing:

NOTE: On the sheet above, I leave a single pixel line between each token--it's faintly visible when cutting the sheets later, but an exacto blade is thicker so the line won't be there when you're done. Note that when I put the sideways tokens down, I left space for my reverse scoring marks. (Keep reading, you'll understand later.)
I print these sheets out with 0.25" left/right margins, and 0.5" top/bottom margins under File > Page Setup. For the Image Settings I set it to Center Both in the dropdown, and do not select Ignore Page Margins.
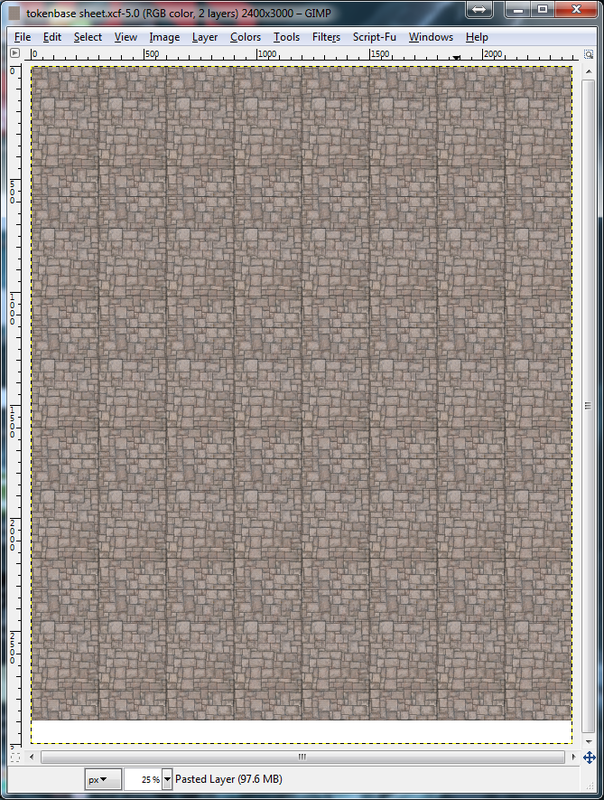
In addition to printing off all your token sheets, you'll need to print off your token bases as well. I was able to fit 40 medium token bases on a single 8"x10" (remember the 300 dpi setting) image in GIMP. Which looks like this:
I print these sheets out with 0.25" left/right margins, and 0.5" top/bottom margins under File > Page Setup. For the Image Settings I set it to Center Both in the dropdown, and do not select Ignore Page Margins.
In addition to printing off all your token sheets, you'll need to print off your token bases as well. I was able to fit 40 medium token bases on a single 8"x10" (remember the 300 dpi setting) image in GIMP. Which looks like this:
assembling your tokens
Alright, you've made a ton of tokens with TokenTool, you've added text to them with GIMP, and you made sheets of them and printed them out, along with bases--now for the final step: Putting them together! For those of you familiar with papercrafting, this will seem pretty obvious--congratulations, you don't need my help anymore! For the rest of you, here's what to expect:
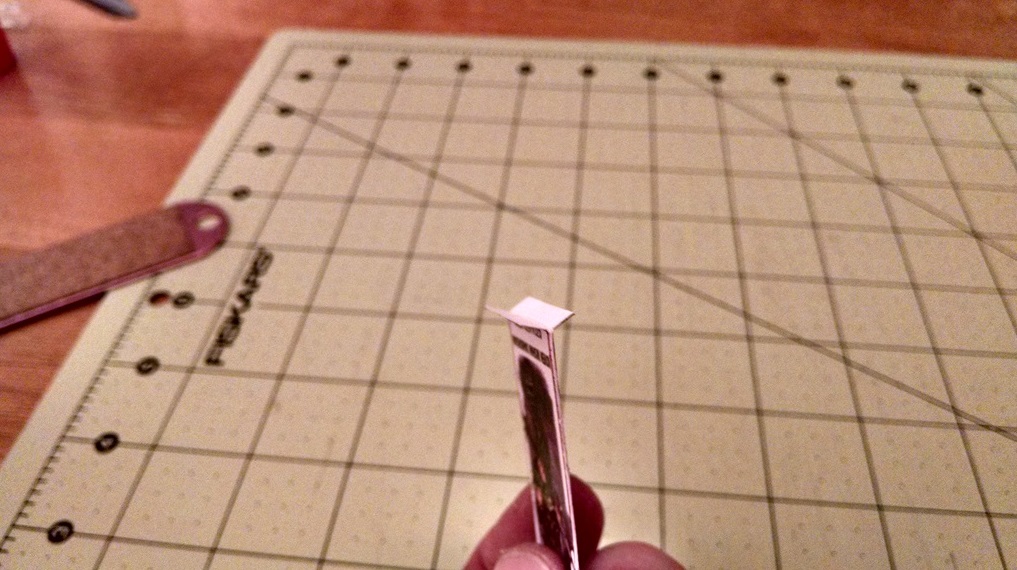
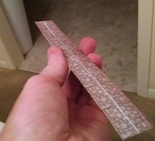
So the first thing you need to do is reverse scoring. Folding 110# cardstock is not very crisp unless you score the paper on the side you're mountain folding (to borrow from origami). We want to fold that little stone tab towards the printed side, so we need to score a line on the opposite side of the page to do that. Lay your ruler along the fold line, and make an incision at either end of the paper, then flip the page and use those as guides for where to put your ruler. Now score the paper, but don't cut all the way through, just light pressure to crease the page. Now when you cut them out it will fold easily. On your token bases you will see there is a square (the bottom) and two "flaps" on either end of it. You need to score the line of those flaps so they will fold over, as well.
When laying out your sheets to print, always make sure to line up the "scoring" lines so you can hit them all at once, like I have in the picture.
When laying out your sheets to print, always make sure to line up the "scoring" lines so you can hit them all at once, like I have in the picture.
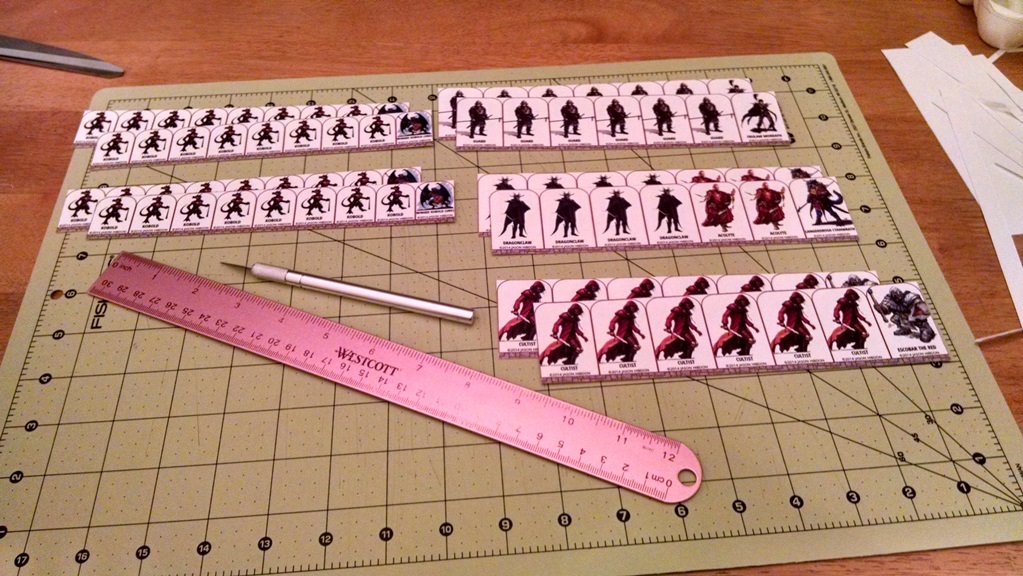
So now I've cut everything out. I don't separate anything that is the same as the tokens next to it, that way I can glue them all together at once. If you do the doubled-up tokens (like in my sheet above) you don't have to separate anything till it's all glued and dry--which is nice.
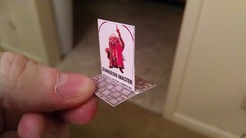
Next step is to glue all of these together--but don't get glue on the stone tab. It should look like this:
Next step is to glue all of these together--but don't get glue on the stone tab. It should look like this:
After gluing everything together I have a bunch of tokens left, but with no bases--and the multiples haven't even been separated yet. (I'll cut them apart with scissors as my last step.)
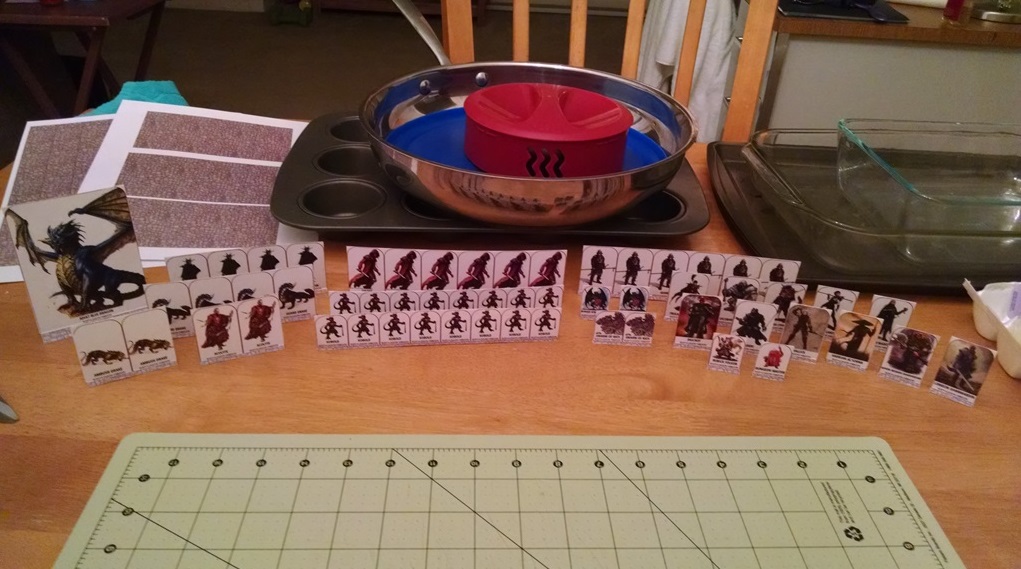
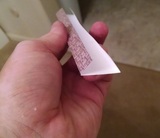
Next I need to score, and cut out all my bases. I glue them a row at a time. Make sure when putting glue on them, don't put glue in the center, only on the tabs, and don't put glue on the last 1/8-1/4" of the tab, either. I did this by having a piece of scrap paper with a fold the width of the stone tabs on the tokens; I would slip the tab of the base under that crease and apply glue, leaving a clean strip on the end. Then fold it up, and you're left with a glue-less "channel" in the middle of the base. Your minis will slide neatly into this slot! These pictures show the process:
 |  |  |
Once you've made a batch of these, you'll find you get to be pretty fast at it. I can shell out three pages of the double-ended tokens while watching a movie.
Happy token making!
NOTE: The medium token is 0.125" larger than the 1" base; this was not technically an oversight, as I made these to be the same dimensions as my Pathfinder Pawns tokens. I do have a Medium Overlay that is slimmed down to 1", but I just didn't like how it looked. Either too skinny if I left the height the same, or too short if I kept the proportions. So they stick out a little.
NOTE: The medium token is 0.125" larger than the 1" base; this was not technically an oversight, as I made these to be the same dimensions as my Pathfinder Pawns tokens. I do have a Medium Overlay that is slimmed down to 1", but I just didn't like how it looked. Either too skinny if I left the height the same, or too short if I kept the proportions. So they stick out a little.
 RSS Feed